

How To Set Up Iclicker
Please asking a meeting with Center for Pedagogy Innovation or you may download the software for Canvas courses from the CTI iClicker site and follow the detailed instructions on this folio.
The following information is for your class if you are using Sheet for your course web site or if you are using Sail only to display clicker question points to your students.
What to tell students | How to set your iClicker plan | How to connect your students' clickers to their names
What to tell students
Step 1: Please follow these instructions to add the iClicker registration link to your Canvas course.
Step 2: Include the following data on your Canvass grade as a page, an announcement, and/or transport in an electronic mail message to all students:
Students in this class may use an iClicker remote.
Ane tin can be purchased at the Cornell Store, or many online sites such as eBay or Craigslist. Whatever type of iClicker brand remote will piece of work: iClicker, iClicker+, or iClicker2 models.
How to annals your iClicker remote through Canvas
To register your iClicker remote:
- login to Canvas at https://canvass.cornell.edu
- click on the name of this class in your listing of Courses
- click oniClicker Registration in the class menu
- type in the iClickerRemote ID on the back of your clicker
- clickRegister
Annotation: Registering your iClicker remote for i Sail form will automatically register your iClicker remote for ALL Canvas courses each semester.
In that location is no demand to register iClickers at the iclicker.com site.
If you cannot read the iClicker remote ID, to find your iClicker Remote ID
Please stop in with your clicker to the CTI Tech Middle, 123 Computing & Communications Middle edifice (on the Ag Quad, near Bailey Hall), between 9:00am – 5:00pm, Monday – Fri, and one of the staff tin can confirm your iClicker Remote ID. Once it has been confirmed, please write it on a pocket-sized piece of paper and place it inside the bombardment compartment.
How to prepare your iClicker program (For instructors only)
Setting up the iClicker software for the first time
- Either yous received the iClicker software from the Center for Educational activity Innovation in a meeting or you downloaded the software from the CTI iClicker site (If you would like to request a coming together, please contact the CTI)
- Connect the white iClicker receiver base to your computer. If you need ane, please contact the CTI
- If you lot are running the iClicker software from a USB flash bulldoze, connect the flash bulldoze to the USB port on the white receiver base of operations. Yous may too need to plug in a power cord to the white receiver base (supplied to you)
- Your reckoner volition recognize the USB flash drive and you may be prompted toOpen Folders and Files (PC) or it will be displayed automatically on your desktop (Macintosh)
- Double-click on the iClicker icon to open this drive
- Locate the iclicker Winand Mac folder on the USB flash bulldoze and double-click the folder
- Double-click theiClicker program icon to start the plan
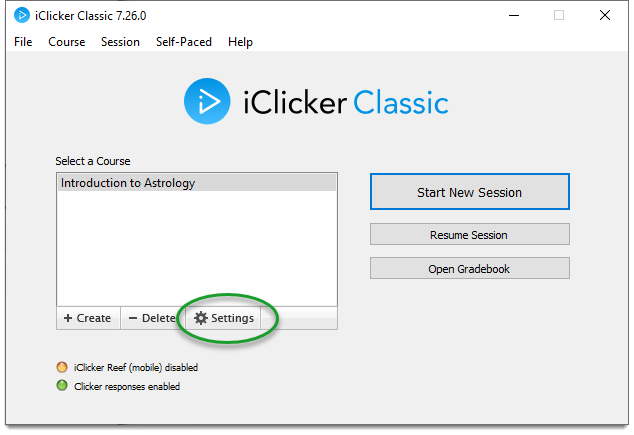
- At the main iClicker screen, click+Create
- In theCreate a New Course window, enter your Course Proper noun (Introduction to Astrology, for example) and clickCreate
- Back at the main iClicker screen, click on your class proper name and then click on theSettings button
-
TheCourse Settings window has tabs along the peak. Y'all can edit the settings in each tab and then save all settings in one case when you are done
Nether the tab:
-
- General: Type in your instructor clicker ID on the back of your blue teacher remote in theInstructor Remote ID field, if y'all have one. The remainder of the settings for the General tab tin be left as is
- Registration: Leave equally is
- Mobile: If you cull to allow utilize of the iClicker Reef Polling app by your students, please follow the steps at the iClicker Reef Polling for Instructors page. This is non required. You lot may skip this tab if you lot will not be allowing the iClicker Reef Polling app to be used in your course. For full details about iClicker Reef Polling, run across the Mobile/Spider web Polling page
- Gradebook:
- In thePrimary Establishment field, if not already filled in, starting time to type in Cornell University and so cull it from the list that will be displayed
- Click theSelect Course button
- TheLearning Management System window volition open: Check the boxAutomatically log me in to my LMS in the lesser-left corner of this window.Click theCornell NetID button
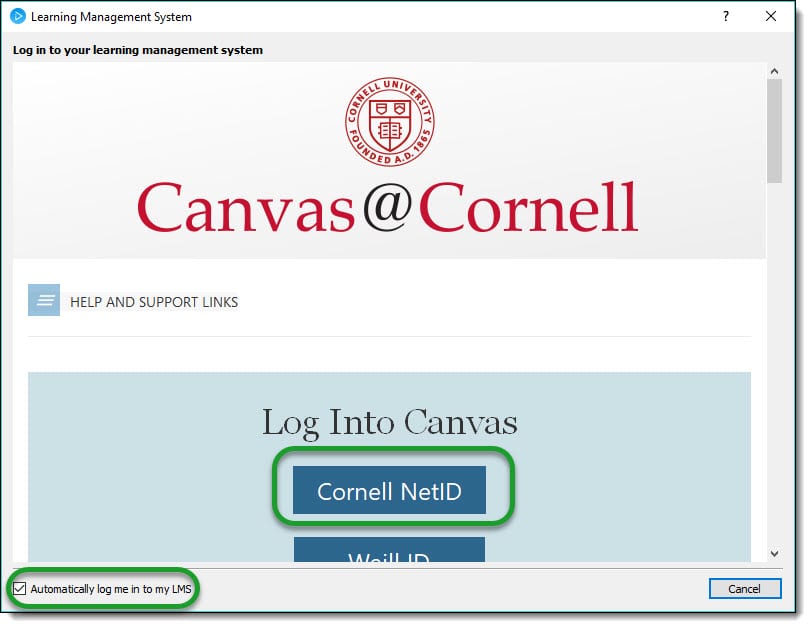
- Type your Cornell NetID and your Password and clickLogin (If you lot are using Cornell's Two-Step Login, y'all will need your second device with you to complete this log-in step)
- Click theLog In button
- Click theAuthorize button and y'all can ignore the bulletin well-nigh the browser not beingness supported by Canvas, if displayed briefly
- From the list of courses, choose the correct one for the class you lot are teaching and click theSelect button
- At present on the iClicker Gradebook tab, this course volition be listed next toLMS Course
- TheServer URL nether theLocally-hosted registration databaseheading should be blank
- Check the two boxes:
Upload zero scores equally zero
Upload Ab (absent) scores equally nil - NOTE: Students are released from the Registrar into Canvas courses for the Fall 2022 semester starting nigh one week before the start of classes
- Ringlet Telephone call: Since you will non exist using the coil-phone call method of pupil clicker registrations, practise not modify theIn-class (roll call) registration settings
- Toolbar: You may choose to alter the size of the toolbar by clicking on the choices next toToolbar size, but well-nigh likely you lot will go out this setting at Normal. You may alter thePolling timer fromCount up from 0 seconds toCount downward from a specified time. Most instructors leave this setting atCount upward from 0 seconds, but you may have a need to automatically limit the amount of fourth dimension students may respond to your questions, such as an in-class quiz. If you want to fix aCount down from time, choose it from the drop-downwards menu and click the radio push button to the left
- Scoring: If you lot will be providing points to your students for responding to clicker questions, this tab is where y'all volition set the points and thresholds for achieving those points. This is broken into ii blazon of points:Participation andPerformance. The settings that you make here in iClicker are set for all questions and all class sessions. Yous may, yet, modify any individual question's signal settings after that grade has ended if you need to in iClicker'southward Gradebook. Please annotation that points tin can be awarded as fractions of a point, allowing you to fix points less than one.00 for both Participation and Performance
- Results: This tab describes the settings for the Results Nautical chart that you display in class after responses have been collected for a question and you have stopped the poll. The default setting ofMultiple choice results every bitColour is recommended. TheNumeric andCurt Respond settings do not utilize, since clickers cannot answer to those type of questions. TheResults display setting is recommended to be unchecked
- Base Display: You can view the responses in real-time as they are submitted by the students on the white iClicker receiver base, which will be in front of you at your lectern. The default setting forMultiple choice display (Show the number of votes for each respond choice) is recommended unless you have more than than 100 students in your class. Then information technology is suggested you alter this setting to:Show the percentage of votes for each answer choice. TheNumeric andShort Answer settings do not utilise, since clickers cannot respond to those type of questions
- Demographics: You tin ask anonymous questions based on certain demographics that you choose, and so view your course content question responses with the demographics included
- Click theSave button to save the settings for all tabs that yous have modified
- If you are prompted with a message "Roster Non Found: Your form roster will not appear in the gradebook until yous sync it from your LMS or get the correct file in your course folder," clickOK to clear this message
- When you are returned to the chief iClicker window, click theOutset New Session push to start a poll

How to connect your students' clickers to their names
To connect your students to their clickers for providing clicker points and to display their points in your Canvas course, follow these steps to connect your Canvas roster with iClicker.
Your student roster and clicker points are managed using theiClicker Integration with Canvas.
-
Features
- iClicker Integrate for Canvas set-up
- Upload clicker points to Sheet Grades
For assistance, delight contact the CTI.
Features of iClicker integration with Canvas
- eliminates manual download/upload of class roster files (updates are made with only a couple clicks)
- allows you to update your iClicker student list from your Canvas roster
- allows you to postal service pupil clicker points to your Canvas Grades
To fix upward iClicker Integrate for Canvas
-
an boosted file, in addition to the iClicker software, is required and it may not accept been provided in your iClicker folder (Delight contact the CTI for assist in determining if you already have the Integration with Canvas file)
- asking the proper settings file to be given to you past:
- requesting a meeting with the Heart for Teaching Innovation staff (Contact the CTI to request this short coming together),OR
- Download the proper settings file: iClicker Integrate for Sail: Macintosh and Windows computers
If you lot request a coming together with the Centre for Education Innovation staff, the steps listed below will be completed at that meeting and y'all do not need to complete them (Please skip downward the folio to Upload clicker points to the Canvass Grade Middle)
If y'all downloaded the software from the CTI iClicker site, the file is included, so yous can skip to step #two. If you downloaded the iClicker software from iclicker.com'due south web site, and downloaded theiClicker Integrate for Canvassfile in a higher place, please follow these steps:
-
After y'all take downloaded the file to your computer, it must be placed in theResource folder of your iClicker folder: iClicker Mac and Win: Resources
- Open theiClicker programme and cull your course
- ClickOpen up Gradebook
- Click theSync Roster button
- If yous have non already set up up your connection to your Canvas class, click hither for the steps. After you have ready upwardly for iClicker Gradebook to connect to your Canvas course, an updated roster will then be displayed in the iClicker Gradebook
- You will now meet the current listing of students who are enrolled in your Sail course (Student names inblue accept already registered a clicker in Canvas while educatee names inscarlet take not yet registered a clicker in Canvas)
To upload clicker points to your Sail course Grades
After yous have used iClicker in at least one form session, follow the steps beneath to upload clicker points to your Sail course Grades:
-
In your iClicker Gradebook, outset click theSync Rosterbutton (this will update your students as well every bit update their clicker registrations)
- Then click theSync Scores push button

- ChooseSelect All or but certain sessions to upload and clickNext
- Choose the settings toUpload Scores to LMS as described:
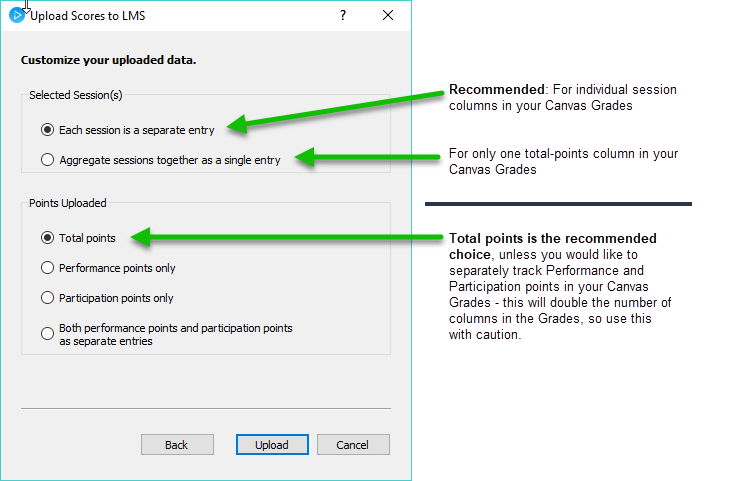
- To upload the scores to your Canvas course site, clickUpload
- Now go to your Canvas course's Grades (here you can view the clicker points equally assigned for each pupil)
Source: https://teaching.cornell.edu/classroom-polling/using-iclicker-canvas
0 Response to "How To Set Up Iclicker"
Post a Comment